|
SImageUtil Doc |
The image component is a COM object DLL that allows ASP code to:
- Determine the image size of the image without decompressing the image.
- Load and decompress jpg, gif or bmp image types.
- Change the image's size
- Draw text on the image
- Save a new copy of the image in compressed jpeg format
- Obtain the EXIF tags from an image
The following example shows how to open an image and just obtain it's size:
Image = Server.CreateObject("SImageUtil.Image");
Image.OpenImageFile("test.jpg");
Response.Write("Size:"+Image.Width+"x"+Image.Height);
The library does not decompress the image unless the image is buffer is touched, either by ChangeSize(), SaveJpgImage(), or TextBox(). Once the image buffer is touched, the original image is decompress into memory and retained until the Image object is destroyed or until Close() is used. This is important since image buffers can be large.
General Image object methods and properties are:
| PhysicalPath | Property that indicates if filenames are either IIS filenames or physical filenames. | |
| OpenImageFile() | Opens an image file. | |
| Width | The image's current width in pixels. | |
| Height | The image's current height in pixels. | |
| AllowEnlarge | Property which indicates in the image can be enlarged during a resizing operation. The defaults to FALSE. | |
| KeepAspect | Property which indicates that the image demenision must maintain the original aspect ratio during a resizing operation. The value defaults to TRUE. | |
| ChangeSize() | Changes the size of the image. | |
| SaveJpgFile() | Saves the image as a JPEG file. | |
| Close() | Closes the current image. | |
| Crop() | Crops the current image | |
| GetPel() | Returns the pixel for the selected coordinates | |
| Thumb() | A composite function which conditionally opens an image, resizes it, saves the new image, and closes. | |
| ErrorOutput | Property that indicates if error output is to put automatically displayed into the IIS output. | |
| LastError | Property that contains the last error message. |
Text image object methods and properties are:
| TextBox() | Draws text onto the image | |
| BoxMargin | Sets the margin between the text box and the image boarder | |
| SetBoxColor() | Sets the color and opacity of the text box | |
| TextMargin | Sets the margin between the text and the text box | |
| SetTextColor() | Sets the default color and opacity of the text |
EXIF Image methods and properties:
| GetExif() | Returns the requested Exif property information. | |
| DumpExif() | Dumps all of the Exif fields (as an HTML table to the IIS output) |
1. Make a directory and copy the "SImageUtil.dll" into it.
2. Install the SImageUtil.dll by running "regsrv32 SImageUtil.dll"
Boolean which indicates if file names provided to OpenImageFile(), SaveJpgFile(), and Thumb() methods are either IIS filenames or physical filenames. The default for this value is 'false' which is IIS filenames.
Remarks:
When using IIS filenames (false) the filename path separator is a foreword slash '/', the path starts at the root of the website, and may contain IIS virtual directories. This is the same style of filename that appears in a HTML hyperlink. When using an IIS name relative filenames are allowed from the current ASP page. IIS filenames are limited to filenames that appear on the local web site.
When using physical filenames (true) the filename path separartor is a backslash, may contain a local driver letter or server name, and starts at the root of the drive/device. This is the type of filename typically used in windows. When using a physical path the entire filename must be specified.
Example:
The following example opens an image in the preview sub-directory:
Image.OpenImageFile("preview/test.jpg");
The following example opens a image in the "C:\Images" directory on the server:
Image.PhysicalPath = TRUE;
Image.OpenImageFile("C:\\Images\\test.jpg");
If you set the PhysicalPath to true on an Image object you can always set it back to false to use IIS paths, or you can perform the conversion from an IIS pathname to a physical one in your ASP code directly. For example, the following opens the same file as the first example but does so when using physical paths instead of IIS paths.
Image.PhysicalPath = TRUE;
FileName = Server.MapPath("preview/test.jpg");
Image.OpenImageFile(FileName);
The primary reason to set PhysicalPath to true is to be able to specify filenames that are outside the website.
| Overview |
Boolean which indicates if error text is to be automatically written to the IIS output. The default for this value is TRUE.
Remarks:
When an error occurs by default the SImageUtil component will output error test to the IIS output stream. If you set this value to FALSE this will not occur. In either case, the last error message that was generated is available as LastError.
| Overview |
A string that contains the last error message. The message is per open interface instance (e.g., the Image handle).
Remarks:
If no error has occurred in the open interface instance this value is an empty string. If an error has occurred, this string contains the error message that was generated. Note this value may be reset to an empty string when this occurs in order to detect the next failure if needed.
Example:
The following example opens an image and checks to see if the operation caused an error.
Image.OpenImageFile("preview/test.jpg");
if (Image.LastError != "") {
Response.Write("Image Error: " + Image.LastError);
return FALSE;
}
return TRUE;
| Overview |
Opens an image file.
Syntax:
Object.OpenImageFile( ImageName)
Parameters:
| ImageName | The filename of the image to open. |
Remarks:
This function opens an image file and reads the image's attributes (such as width and height). It does not decompress or read the image itself. The image is decompress when the image buffer is first accessed.
The ImageName is a local URL style path name or a physical pathname based on the PhysicalPath setting. The default is a local URL style name.
Currently only JPEG, GIF and BMP image file formats are supported.
Example:
The following example reads the image's width and height.
Image.OpenImageFile("photos/test.jpg");
Response.Write("The image width is: " + Image.Width + "<BR>");
Response.Write("The image height is: " + Image.Height + "<BR>");
Image.Close();
| Overview |
The Width and Height properties are read-only properties that returns the image's current width and height. When the image is first opened the Width and Height are that of the original image. If the image size is changes, the Width and Height are the new image's size.
Example:
The following example reports the image's width and height after changing its size.
Image.OpenImageFile("photos/test.jpg");
Image.ChangeSize(320,240);
Response.Write("The new width is: " + Image.Width + "<BR>");
Response.Write("The new height is: " + Image.Height + "<BR>");
| Overview |
By default a change size operation will not allow either vertices of an image to be enlarged over the original image's size. To disable this, set this property to true.
Example:
Image.AllowEnlarge = true;
Image.OpenImageFile("photos/test.jpg");
Image.ChangeSize(Image.Width*2, Image.Height*2);
Note that the AllowEnlarge property can be set on the image object at any time. An image does not have to be opened to set this property.
| Overview |
By default a change size operation will not allow either vertices of an image to be changed disproportionate to one another. To disable this, set this property to true.
Example:
The follow example reads the image's width and height.
Image.KeepAspect = false;
Image.OpenImageFile("photos/test.jpg");
Image.ChangeSize(Image.Width/2, Image.Height);
Note that the KeepAspect property can be set on the image object at any time. An image does not have to be opened to set this property.
| Overview |
This function changes the size of the image.
Syntax:
Object.ChageSize( NewWidth, NewHeight)
Parameters:
| NewWidth | The requested width for the image. | |
| NewHeight | The requested height for the image. |
Remarks:
By using ChangeSize() the image buffer will be decompressed if not already done so. Once the image buffer is decompressed it remains in memory until the Image object is destroyed or until a Close() is performed.
ChangeSize() creates a new image buffer from the original image and this becomes the new image for the object. The size of the new image will be bounded by the current AllowEnlarge and KeepAspect property settings. Reading Width and Height after calling ChangeSize() will yield the actual width and height of the new image.
Example:
The following example creates a thumbnail from the image
Image.OpenImageFile("photos/test.jpg");
Image.ChangeSize(150,150);
Image.SaveJpgFile("thumbs/test.jpg", 75);
Image.Close();
Since ChangeSize() always creates the new image from the original image, it can be used to create more then one image at a time without lose of quality due to multiple sizing operations. This can be useful in removing decompression steps (which can be time consuming). For example, the following to sequences yield the same results but the first is quicker:
// Example #1:
Image.OpenImageFile("photos/test.jpg");
Image.ChangeSize(150,150);
Image.SaveJpgFile("thumbs/test.jpg", 75);
Image.ChangeSize(400,400);
Image.SaveJpgFile("preview/test.jpg", 75);
Image.Close();
// Example #2:
Image.OpenImageFile("photos/test.jpg");
Image.ChangeSize(150,150);
Image.SaveJpgFile("thumbs/test.jpg", 75);
Image.OpenImageFile("photos/test.jpg");
Image.ChangeSize(400,400);
Image.SaveJpgFile("preview/test.jpg", 75);
Image.Close();
| Overview |
Saves the current image as a JPEG file.
Syntax:
Object.SaveJpgFile( ImageName, Quality)
Parameters:
| ImageName | The path name to the file to create. | |
| Quality | The JPEG compression quality for the saved image. From 1 to 100, where 100 is the best quality. The default for this value is 75. |
Remarks:
The current image is compressed based on the Quality setting and saved to ImageName. Note that SaveJpgFile() will create the entire directory tree to the destination filename if it does not already exist. If the destination ImageName file already exists, it will be replaced. The ImageName is either a local URL path name or a physical pathname as determined by the PhysicalPath setting. The default is a local URL path name.
Note if you put text on the image with TextBox() you will likely want a very high quality setting when saving in JPEG format.
Example:
The following example creates a copy of the image with a lower then normal quality setting.
Image.OpenImageFile("photos/test.jpg");
Image.SaveJpgFile("lowqual/test.jpg", 50);
Image.Close();
| Overview |
Closes the opened image file and release any associated memory for the image.
Syntax:
Object.Close()
Remarks:
There is an implicit close when the Image object is destroyed; however, depending on the size of the source image uncompressed image buffers can be quite large and if the image is no longer needed a Close() can be perform to free memory right away.
| Overview |
Crops the image.
Syntax:
Object.Crop( X, Y, DX, DY )
Parameters:
| X | X coordinate of the upper left corner. | |
| Y | Y coordinate of the upper left corner. | |
| DX | Width along the X axis. | |
| DY | Height along the Y axis. |
Remarks:
This functions crops the image such that the new image contains the image formed by the rectangle X,Y,X+DX,Y+DY of the original image.
Example:
Pull out a 100 x 100 image from the center of the original and then save it.
Image.Crop(Image.Width/2-50, Image.Height/2-50, 100, 100);
Image.SaveJpgFile("test.jpg", 75);
| Overview |
Returns the pixel value at the selected coordinates.
Syntax:
Object.GetPel( X, Y, RGB)
Parameters:
| X | X coordinate of the pixel. | |
| Y | Y coordinate of the pixel | |
| RGB | The color value of the pixel |
Remarks:
This function is not used by ASP but is instead used by other C++ components. It returns the 24 bit RGB value of the selected pixel.
| Overview |
The do-it-all function. Creates the DstImage from the SrcImage if the DstImage does not already exist.
Syntax:
Object.Thumb( SrcImage, NewWidth, NewHeight, DstImage, Quality)
Parameters:
| SrcImage | The filename of the source image. | |
| NewWidth | The requested width for the destination image. | |
| NewHeight | The request height for the destination image. | |
| DstImage | The file name of the destination JPEG image. | |
| Quality | The JPEG compression quality of the destination image. |
Remarks:
This function first checks to see if DstImage exists. If such a file exists, no further operation is performed and control is returned to the running script.
If DstImage does not exist, the function opens the SrcImage with OpenImageFile(), applies a ChangeSize() on it for NewWidth and NewHeight, and then a SaveJpgImage() with Quality, and finally a Close(). This sequence is performed on at most one thread at a time on the local server as to not swamp the server. (E.g., if multiple threads call Image.Thumb() currently for DstImage's that do not exist, they will be decompressed, sized, recompressed and saved one a time. Serialization only occurs if the DstImage does not exist).
The current set rules for AllowEnlarge and KeepAspect are used during the ChangeSize(), and the PhysicalPath setting determines the SrcImage and DstImage pathname type.
Example:
Make sure we have the preview image, else create it.
Image.Thumb("test.jpg", 320, 240, "preview/test.jpg", 75);
| Overview |
Draws text on the image.
Syntax:
Object.TextBox(Position, Text)
Parameters:
| Poistion | The position on the image to put the text. | |
| Text | The text to format and put onto the image. Note this may contain simple HTML like control sequences. |
Remarks:
The Text is formatted and fitted into a box. The entire box of text is then placed on the image according to Position. The background color of the box is set with SetBoxColor() and may be set to any color and opacity - including clear (e.g., no background). The color of the text defaults to SetTextColor(), and again may be set to any color and opacity. In addition, the color of the text can also be controlled with a <font> tag in the Text string.
The Text string may include the following escape sequences:
| | A space (" ") is rendered. | |
| " | A double quote sign is rendered. | |
| < | A less then sign ("<") is rendered. | |
| > | A greater then sign (">") is rendered. | |
| & | A ampere sign ("&") is rendered. | |
| #xx; | The hexadecimal character code xx is rendered. |
The Text string may include the following tagged modifiers:
| <br> | Starts a new line. | |
| <left> | Causes the current line to be left-justified within the text box. | |
| <center> | Causes the current line to be centered within the text box. | |
| <right> | Causes the current line to be right-justified within the text box. | |
| <big> | Increase the font size by 1 point. A </big> decreases the font size by one point. | |
| <small> | Decreases the font size by 1 point. A </small> increases the font size by one pont. | |
| <i> | Starts italics print. </i> stops italics print. | |
| <u> | Starts underline print. </u> stops underline print. | |
| <b> | Stats bold print. </b> stops bold print. | |
| <font ...> | Sets the current font face, size, color and opacity. |
The <font> tag may include the following attributes:
| face= | Sets the type face of the font. The type face is the name you find in the drop down menu in apps like word. E.g.,: <font face=Arial> or <font face='times new roman'> | |
| size= | Sets the point size of the font. | |
| color= | Sets the color of the font. The color may be a color name (white, black, etc..) or a hexadecimal RGB value. E.g.: <font color=gray> or <font color=#7f7f7f> | |
| opacity= | Sets the opacity of the font. 100 being solid. 0 being clear. |
The default font and colors are: Arial 10 pts black with a 60% white background.
The colors available by name are: black, white, red, green, blue, yellow, magenta, cyan, gray, darkred, darkgreen, darkblue, lightbrown, darkmagenta, daycyan.
The Position argument is used to determine the relative position of the text on the image. The TextBox() function automatically determines the absolute drawing position based on the size of the text being drawn and the Position selected. There are nine positions:
| 0 Upper Left |
1 Upper Centered |
2 Upper Right |
| 3 Middle Left |
4 Middle Centered |
5 Middle Right |
| 6 Lower Left |
7 Lower Middle |
8 Lower Right |
A ChangeSize() will erase the text draw on the image. All text must be drawn after the size of the image has been changed (if the size is being changed).
Examples:
Example of position:
|
Image.TextBox(0,
"Pos 0"); |
Produces: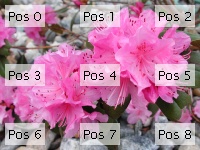 |
Example of formatting and alignment::
|
Str = "On the <u>left</u><br>"; |
Produces: |
Example of font tag:
|
Str ="<font color=blue size=12>1 Flowers<br>"; |
Produces: |
Note: You can only use fonts that are installed on the server (or whatever machine you are running your code from). Supplying a font name that does not exist will cause the system to pick a default font for your.
| Overview |
The number of pixels between the text box and the image. The default is 5.
Examples:
Example shows setting the BoxMargin to zero before putting text at position #8 causing no margin between the text and the edge of the image.
|
Image.TextBox(0,
"Pos 0"); Image.BoxMargin = 0; Image.TextBox(8, "Pos 8"); |
Produces: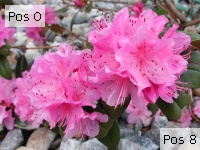 |
| Overview |
Sets the color of the text box.
Syntax:
Object.SetBoxColor(ColorStr, Opacity)
Parameters:
| ColorStr | The color to set the text box too. | |
| Opacity | The opacity of the color. 100 begin solid. 0 being clear. |
Examples:
The following images show a different background opacities for a white and black background.
// Black background,
white text sample
Image.SetTextColor("white", 100);
for(i=0;i<9;i++) {
p = Math.min(100,i*13);
Image.SetBoxColor("black", p);
Image.TextBox(i,String(p+"%"));
}
White background, black text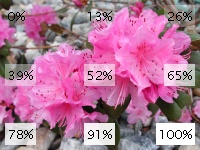 |
Black background, white text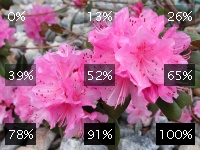 |
Note that 0% opacity is no background, and 100% opacity is a solid background.
| Overview |
The number of pixels between the text and the text box. The default is 3.
Examples:
The example shows a TextMargin of 0 and 10.
|
Image.TextMargin = 0; Image.TextBox(0, "Pos 0"); Image.TextMargin = 10; Image.TextBox(8, "Pos 8"); |
Produces: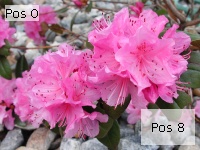 |
| Overview |
Sets the color of the text.
Syntax:
Object.SetBoxColor(ColorStr, Opacity)
Parameters:
| ColorStr | The color to set the text too. | |
| Opacity | The opacity of the color. 100 begin solid. 0 being clear. |
Remarks
The SetTextColor() function can also be performed with the <font> tag in the text being displayed.
Examples:
|
Sold white text with no background
Image.SetBoxColor("black", 0); |
Produces: |
|
50% opaque white text with no background
Image.SetBoxColor("black", 0); Or.. Image.SetBoxColor("black", 0); |
Produces: |
| Overview |
Returns the requested Exif tag.
Syntax:
Object.GetExif(ShortName)
Parameters:
| ShortName | Short name of the Exif tag. |
Remarks
This function returns the requested Exif information as a string. If the Exif information is not found, then an empty string is returned.
The ShortName is formatted as: Prefix.Name. Where Prefix is "Main.", "Sub.", an OEM ID, or "". Following the Prefix is the name of the requested field. Each prefix has its own list of possible fields that are currently understood by simageutil. "Main" and "Sub" fields are standardized Exif tags that many camera manufactures supply. An OEM specific prefix are fields that are specific to an OEM type.
A field with a prefix is an internally produced field that simageutil creates from the Main, Sub, and OEM prefixes that it found. This makes life a lot easier for displaying common data as these fields.
The comprehensive list of fields that are understood are in the Exif.cpp source file. To get a listing of the Exif fields that your camera is providing use DumpExif(). If Name (of Prefix.Name) is a number then that is a tagged field that simageutil doesn't not understand. You can still obtain the field with GetExif() by using the ShortName as it appears in DumpExif().
For more information see the Exif notes and web sample page.
Example:
// display the camera model
ResponseWrite("Camera Model: "+Image.GetExif("Model")+"<br>");// display the Nikon specific focus mode
ResponseWrite("Focus Mode: "+Image.GetExif("Nikon.Focus")+"<br>");
| Overview |
Returns the requested Exif tag.
Syntax:
Object.DumpExif()
Remarks
This function dumps all the found Exif information from the image to the HTML output device. This function is used for debugging. Refer too the Exif notes and web sample page to see a sample output from this function.
Example:
// dump all Exif information
Image.DumpExif();
| Overview |
| Return to top page | Page hits: 28,243 |