
| Cabinet | |
| Home Front >Controls Wiring Back Marquee | |
| Links | |
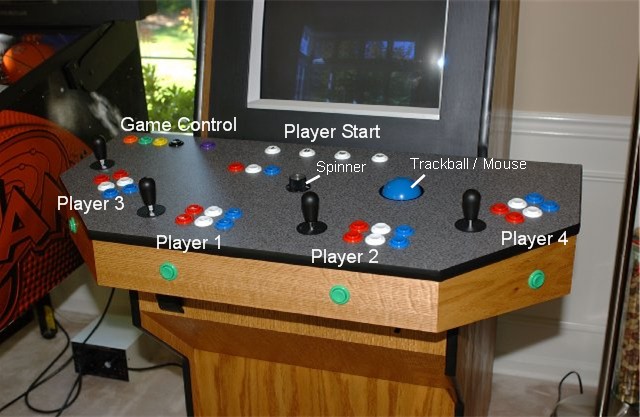
I wanted to make the whole game as small as possible, but my kids wanted it to be a four player game. So the control deck is divided into 4 player areas, with a single player track ball area with the trackball control buttons being separate from the rest. The angles are 45 degrees which is a bit steep but it made the control deck 39.5" x 17.5". But to do this the corner of the trackball plate overlaps one of the joystick #4, and joystick #3's mount plat actually is recessed into the side wall of the deck slightly.
You can't see it so well in this picture, but on the "front" page you can see that the control deck is angled slightly by the front panel of the deck being shorter then the rear. I felt this made for a more attractive looking unit as oppose to tilting the whole control cabinet enclosure.
| Player Area | |||||||
| Each player area is has 1 joystick, 6 action buttons, and a coin insert
button. I put the 1, 2, 3 and 4 player start buttons up top.
Some games want them near each player, but many do not. The 6 action buttons are 1.5" apart (from the center), and the joysticks (player 1 & 2) are 12" apart. The Player 3 & 4 joysticks are similarly spaced but the angle is taken into account as well.
|
|||||||
| Trackball | |||||||||
|
The trackball is positioned such that you can access it without bumping into a joystick, and the trackball buttons (left of the spinner) are up high enough to let you rest your hand without pressing the player 1 buttons. I really wanted to get the trackball installed without the stupid mounting plate messing up the top of my control deck. I figured I could router the top of the deck down, recess the mounting plate and then laminate over the top of it. It worked great! Not only did the mounting plate "go away", but it appears to actually be designed to do this. The black plastic lip around the trackball ended up being flush with the laminate.
|
|||||||||
| Spinner | |||||
|
The spinner is the only control that has marginal placement on the control deck, but it's livable. I basically put it dead center because no other spot seemed any better. For a while I couldn't decide if I should add a spinner or not. I mean only a couple of games seem to use it, and most that I don't play too much. But after the expense of the trackball the spinner was no big deal.
|
|||||
| Game Control | |||||
|
On the top I added some other buttons for game control. These are for things like: emulator settings, emulator exit, and pause. For me the "pause" button is important, so I pulled it away from the rest of them a bit. It is the purple one. Also you can't see it on this picture, but below these on the left is a button for "shift" to allow some other settings as well.
|
|||||
Under the control deck I stuck some other controls.
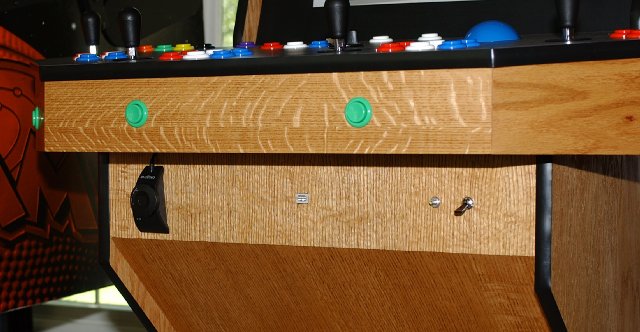
Under the control deck I stuck some other controls.
| Left | |
|
On the left is the volume control knob for the Creative Inspire 2.1 speakers. |
|
Middle |
|||||
|
In the center is a USB plug. This allows me to plug in a keyboard or perhaps some other controller if I need :^) I basically mounted the end of a USB extension cord here.
|
|||||
Right |
|||||||
|
On the right is a push button and a paddle switch. The paddle switch is power, and the button turns on/off the marquee light.
|
|||||||
| Home | |||||
| |||||


| This page was last modified on May 28th 2009 | Page hits: 17,658 |